Mon - Sat 8:00 - 18:00
1680 Sismet Rd, Mississauga, ON L4W 1R4
Calculating Roof Area
24
Nov
Calculating Roof Area

It is always a smart move to make a preliminary estimation of your potential metal roof. An honest contractor is always there to make sure the calculation is precise and to the point. This helps to avoid two extremes: insufficient supplies (which slow down the construction process) or overplus of the materials (which leads to needless expenses).
What is the Point of Measuring the Roof?
Re-roofing a building is a big project, and it is reasonable to run the numbers before committing to major expenses. Knowing your materials square footage and budget will secure you from inflated quotes or unnecessary moves.
Several Guidelines Before You Begin Measuring
There are a couple of initial measurements that you can do from the ground.
- You can measure the area along eaves and across gables (pay attention to the overhang).
- You can also get the numbers by using dimensions of your preceding roof. Standard shingles have tabs with one-foot width with a vertical five-inch outlook.
- Bear in mind that you might here roofing contractors mention “one square” which in professional slang means one hundred square feet.
Required tools
- Tape measure with inch scale
- Grip paper with ¼” squares and a clipboard
- A pencil and an eraser
- Plastic pitch and slope locator or a roof calculator app.

Plan of Action
1. Make a rough sketch of your project. Start with the longest dimension to give your drawing an accurate look.
2. Measure and mark all the dormers, valleys, hips and protrusions. You will also need to measure the size of chimneys, vents, skylights, and pipes. This will help you to understand how many trimmings and flashings are required for the roof installation.
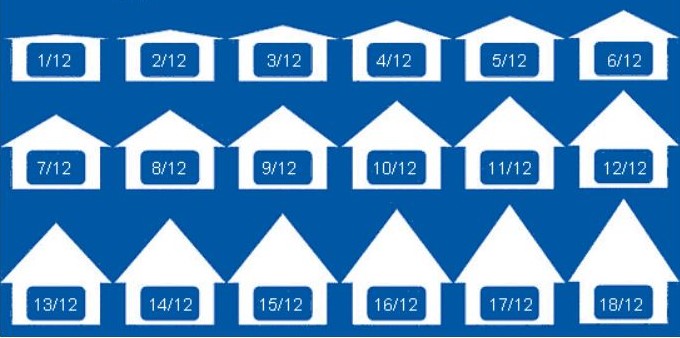
3. Find out the Pitch of the Roof. When we say pitch, we imply how steep the roof is. The vertical measurements include the rise, while the horizontal measurement incorporates the run. So, the angle can be determined by figuring out how many inches the roof escalates up for each 12-inch interval it goes flat. For instance, a roof that rises 8 inches for each interval of 12 inches of horizontal run has an 8-in-12 pitch.
| Pitch | Angle° | Factor | Pitch | Angle° | Factor | |
|---|---|---|---|---|---|---|
| 1/12 | 4.8 | 1.003 | 2/12 | 9.5 | 1.014 | |
| 3/12 | 14.0 | 1.031 | 4/12 | 18.4 | 1.054 | |
| 5/12 | 22.6 | 1.083 | 6/12 | 26.6 | 1.118 | |
| 7/12 | 30.3 | 1.158 | 8/12 | 33.7 | 1.202 | |
| 9/12 | 36.9 | 1.250 | 1.250 | 39.8 | 1.302 | |
| 11/12 | 42.5 | 1.357 | 12/12 | 45.0 | 1.414 | |
| 13/12 | 47.3 | 1.474 | 14/12 | 49.4 | 1.537 | |
| 15/12 | 51.3 | 1.601 | 16/12 | 53.1 | 1.667 | |
| 17/12 | 84.8 | 1.734 | 18/12 | 56.3 | 1.803 | |
| 19/12 | 57.7 | 1.873 | 20/12 | 59.0 | 1.944 | |
| 21/12 | 60.3 | 2.016 | 22/12 | 61.4 | 2.088 | |
| 23/12 | 62.4 | 2.162 | 24/12 | 63.4 | 2.236 |
4. Estimate the area of the simple parts of the roof. The roof can be divided into small rectangles, triangles and squares. Sometimes it is easier to calculate the area by summing up the areas of smaller parts. Just find the footprint area and multiply it by pitch factor. Professional note aside: when calculating the valley length, do not forget to add minimum 12” lineal inches of valley material to eliminate a chance of insufficient material supply.
5. Define the complicated parts of the roof. Residential houses usually have difficult roof structures. You need to consider all the numerous pitches, turrets, dormers. Try dividing the roof into small sections including all the outward outstanding parts. Then add up all the sections and round up the figure to the biggest number.
6. Calculate the gable length. To do this you need to use the slope factor and the run length. To get the run length you need to measure distance from eave to eave and divide it by 2. Then multiply the run figure by the slope factor.
7. Think About the waste factor. It is sensible to use 15% waste factor. So, multiply your initial feet calculations by 1.15. The ultimate number of feet is the amount of roofing material needed.


